web templates free download
Piano Nanny - Free Piano Lessons
Starter Studies

Lesson 11 - Section 1

Pop Quiz

Pop Quiz!

Yes, this is a pop quiz. You will want pencil and paper to take this quiz.


Click or Tap to take Quiz
(close quiz window when you have finished to return here)

Lesson 11 - Section 2

Grand Staff

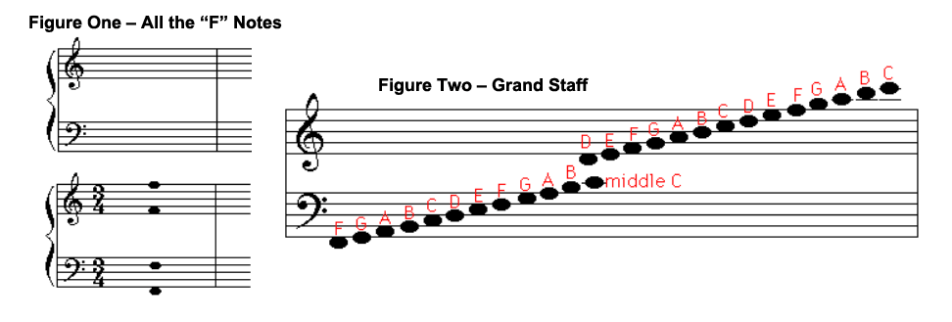
Exploring the Grand Staff

In your music note book, you are about to make a chart. This chart will show all the same name notes and their location on the staff.


Look at the example in Figure One in the image for this section. Figure One shows all the “F” notes.

We will be making a chart for only the notes that are between the lowest and the highest note shown below on the Grand Staff (see Figure Two).

When making your chart, be sure and draw in the Treble Clef and the Bass Clef for each set of notes. You may choose your own Time Signature for each set.

The “F” notes are already drawn for you in Figure One. Copy this set of notes to your music note book (as shown in Figure One).

Now finish the chart in your music note book with the following:

Make a set for all the “G” notes shown on the Grand Staff (Figure Two).
Make a set for all the “A” notes shown on the Grand Staff (Figure Two).  
Make a set for all the “B” notes shown on the Grand Staff (Figure Two).  
Make a set for all the “C” notes shown on the Grand Staff and also labeled “middle C” (Figure Two).  
Make a set for all the “D” notes shown on the Grand Staff (Figure Two).  
Make a set for all the “E” notes shown on the Grand Staff (Figure Two).  

When you have found all the notes with the same note name and grouped them into a set in your music note book, proceed to Section 3.

Lesson 11 - Section 3
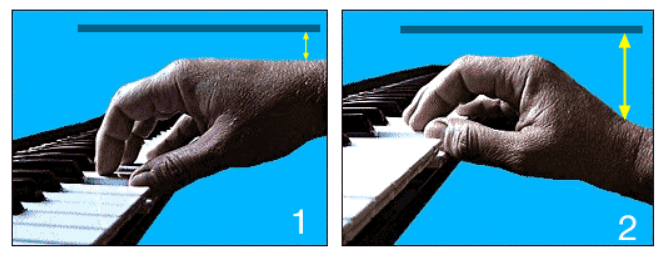
Hand Posture

Proper Hand Posture

Lots of work in this lesson? Yes there is. This is the next to the last section, so hang in there.


We need to talk about technique. Remember our discussion on assigning each finger a number? This was a way to help you so that your fingers don’t trip over each other. There is another part to this problem. It is called Hand Placement or Hand Posture. Your hands need to be in the correct position in order to work with the finger numbering system.

Look at the image for this section. Figure 1 shows the correct placement for your hand. Figure 2 shows the incorrect placement of your hand. The top of your hand should be parallel with the keys on the piano. The yellow line shown in each figure is parallel with the keys. Place your hand on your keyboard as shown in Figure 1. Notice that your forearm is now also parallel with the keys on your keyboard. When you are ready to strike (play) a note on your keyboard, keep in mind that your wrist is the hinge point. Your elbow is not a hinge point. And, your knuckles are not hinge points. The only movement used to strike a note is at the wrist and of course, your finger joints. The action is similar to scratching the top of your leg. Try it.

Here are some other tips for body technique in relationship to playing the piano:

Your fingers should remain slightly curled under your hand.
You should sit up straight similar to sitting and typing a letter.
You arms should be generally relaxed at the elbows.
Your right foot should be placed ahead of your left foot (your heel helps support your back).

Lesson 11 - Section 4

You are Truly Wonderful!

This lesson is over with . . . done, complete, end, finished. Good job. I admire your desire to play the piano. If you have come this far on your own without a teacher being in the room with you and pushing you, it is obvious that you do have what it takes to become a great piano player. I bow to you. Thank you.


Some day you will need a mentor, teacher, or tutor to help you sharpen the skills you are learning in this online course. Remember that each person has some wisdom to impart to you. You will not learn to play the piano from only one person or place. Learning to play the piano is a journey and NOT a single event.

I wish you much luck and success in your journey. There will always be high points and low point along the way. I don’t know about you but, when I go on a journey (such as going for a drive in the car), I’d rather drive on a road with hills and curves than a road that is flat, boring, and straight.

“Blessings to you on this day and each day after.” 


© The Art Department - All Rights Reserved - Privacy Policy